APRIL MEETING RE-CAP

SFMQG April Meeting 2018

IMG_0085.JPG


Attendance-48 members signed-in
5 Guests

  • Nancy Patchell Knoll - Port St Lucie - joined online after meeting!
  • Esta Ruben - Port St Lucie
  • Barbara Garvine - Miami - with Anita Thompson
  • Marie Christine Leavitt - Delray - with Melinda Schwartz and Diane Paquin-Provost 

A special welcome to our new member Nancy Patchell Knoll!

Treasurer’s Report: Closing Balance 5145.61

Community Project Updates:

Ryan’s Case for Smiles:  Susan made available additional fabric kits for members.  Pillow cases are to be sewn with enclosed seams using French seams or Serger.  Members are asked to return the WASHED pillowcase, at the May meeting, in the Ziploc bag provided. 

Susan shared a Thank You note from the Nicklaus Children’s Hospital Foundation for the donated pillowcases.  The note reads,” …Your donation of time and effort as well as the pillowcase themselves is amazing!”.

Community Service Project:  Wanda and Susan gave an update for the charity quilt project.  Precut fabric was available, along with printed instructions for the French Braid Block quilt pattern. The Community Service project quilts will be donated to the Menorah House in Boca Raton in November.

SoBe Charity Quilt:  Healthy Mothers Healthy Babies of Palm Beach County was selected as the quilt recipient. The quilt was delivered by Abby Bill and will be auctioned at their annual fundraising event on Friday, May 11 at the Country Club at Mirasol.  The guild has received a Thank You letter acknowledging our donation. 

Marjory Stoneman Douglas (MSD) HS Quilt Project will continue through the end of the month.  The project has received extraordinary support from the quilting community.  

BQE Update:  

BQE 2019 will be a weeklong event, March 4th thru March 10th.  Additional details on the BQE schedule of events will be sent out in the SFMQG Event Notification.  In the meantime, opportunities for individuals and guild participation was discussed and is listed below. 

Contact BQE directly at 954-376-6048 or Hello@browardquiltexpo.com for more information.

Mystery QAL: 

Mystery QAL Clue #1 April

Mystery QAL Clue #1 April

Patty gave the first clue for the Mystery QAL.  Visit the blog for details.  Each clue will be posted on the blog within 7 days of the SFMQG monthly meetings.  Look for Mystery QAL Clue # 1 on the blog. 

April BOM:

Linda showed a sample of the April BOM which will be due at the May meeting.  It’s a modern retro TV quilt block. Check out the blog for a photo and instructions. This will make a perfect and cherished Father’s Day gift for a father or father figure.  Check it out!

Upcoming Events:

  • May 4th, 5th and 6th-Michelle Wilkie lecture and workshops.  To see her quilts, visit her web site www.factotum-of-arts.com 
  • June 2nd-Kate Yates Bag Class Sew Day.  Kate will on hand to provide instructions on sewing the Travers Bag. To see examples search “Traverse Bag” on the internet. 
  • August 4th-Nicole Kaplan will introduce Barn Quilts during our Sew Day

Member’s Spotlight on Judy: 

One of Judy's First Quilts. 

One of Judy's First Quilts. 

Judy took us on a quilting journey depicting her transition from academia to quilting aficionada.  Judy’s quilts are impressive and unique.  Her personality is intertwined and conveyed through her quilts.   Since a photo is worth 1000 words, see the photo gallery for the April meeting. I have included photos of Judy and her quilts for your viewing pleasure.

Special Presentations: 

Andrea presented quilting with solids

Andrea presented quilting with solids

We were treated to a presentation on constructing Modern Quilts using solids fabric colors. Andrea provided examples of how solids can be used to achieve beautiful improv quilts.   

Challenges:

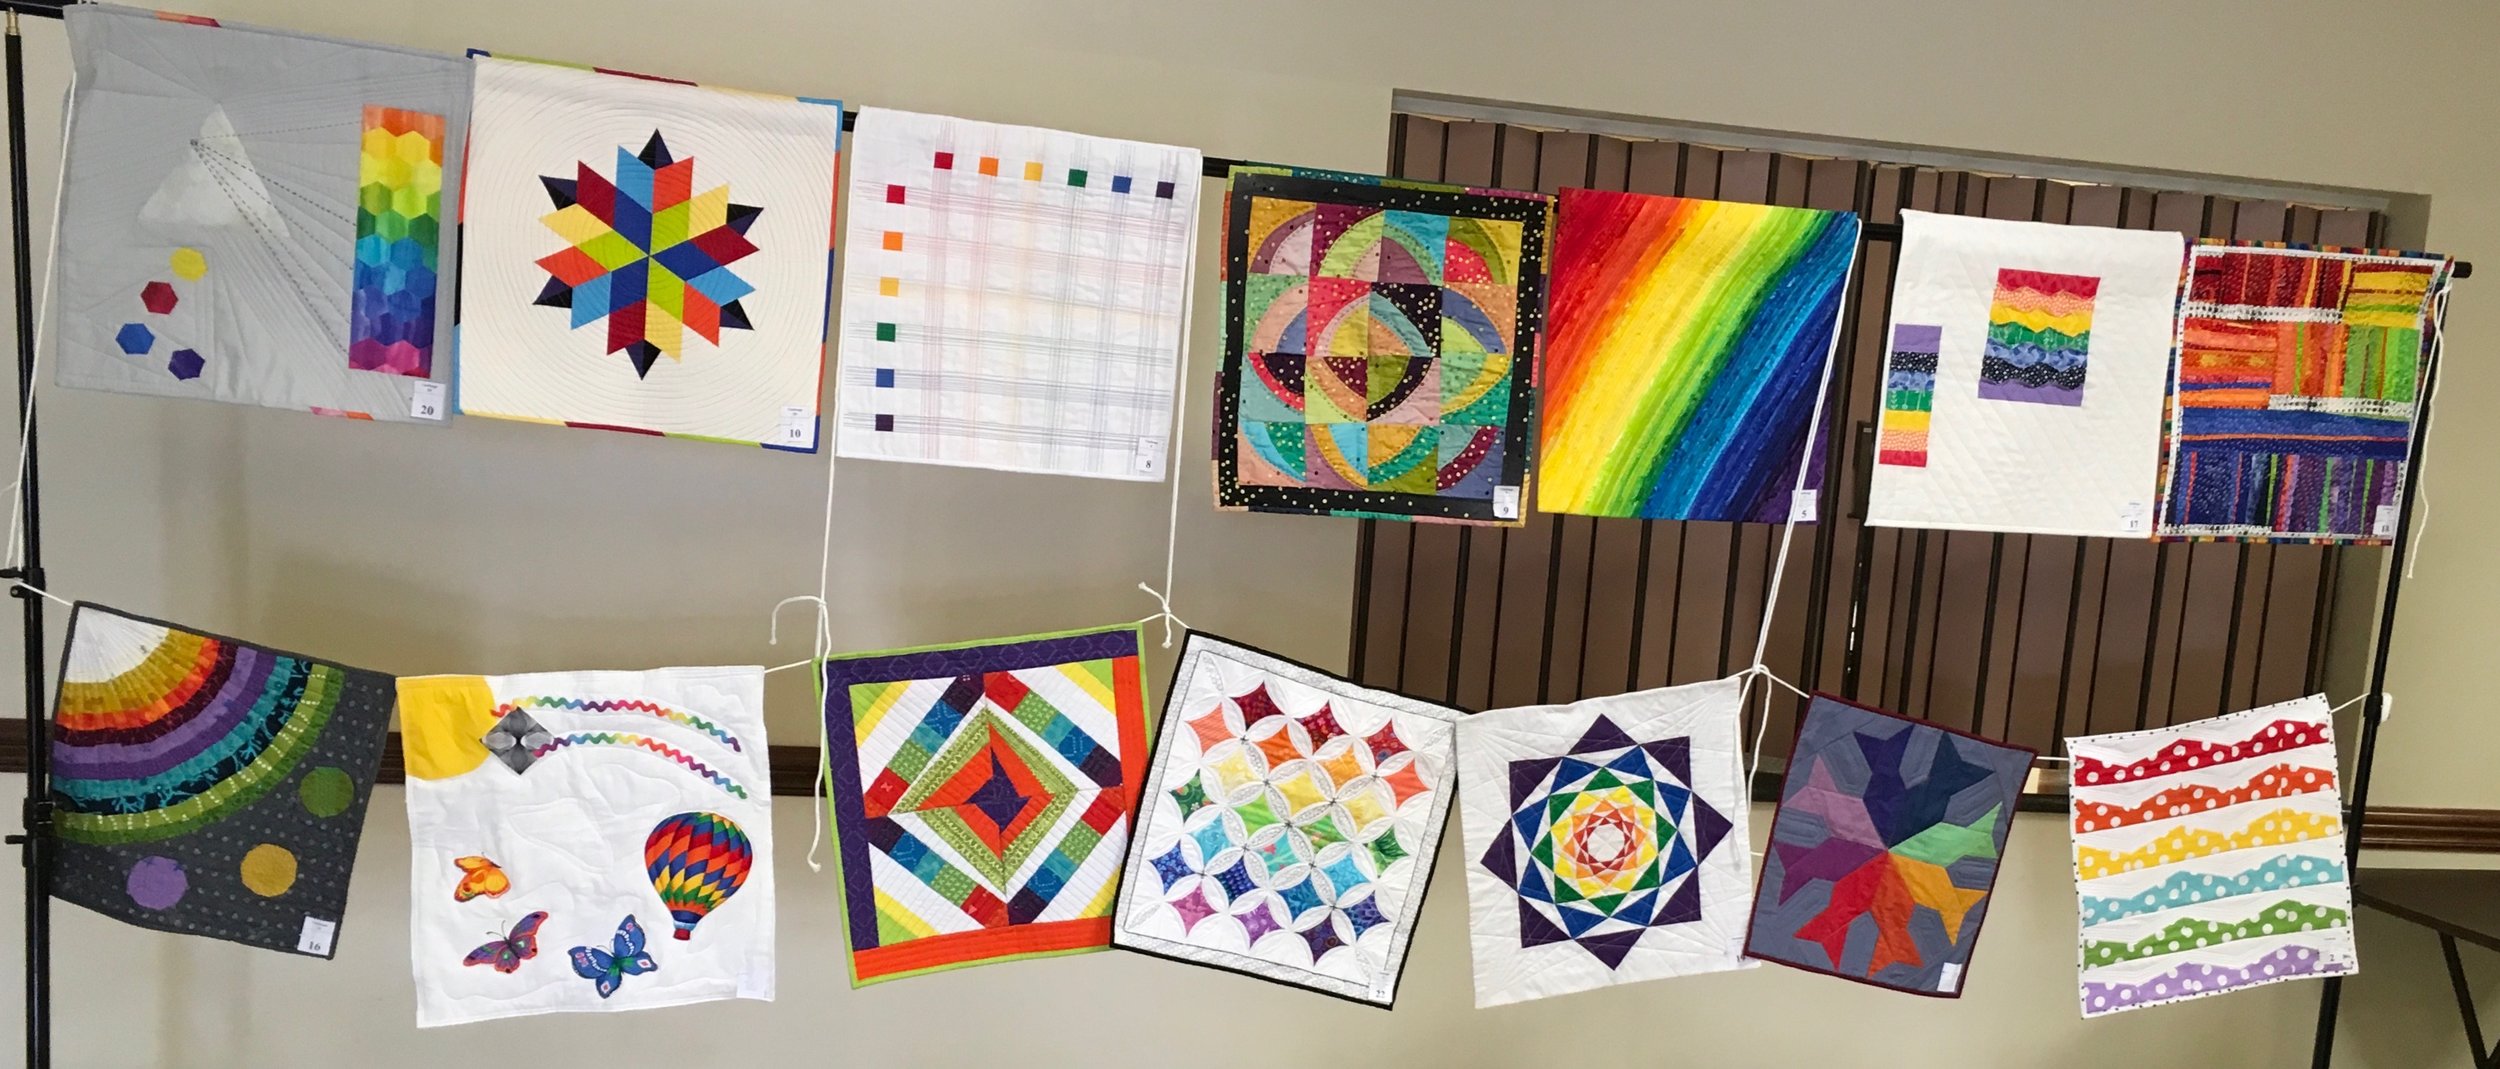
Our very own Rainbow Quilt Challenge entries were displayed. We thank everyone who entered a quilt. The Viewer’s Choice Award was received by Charlotte Noll.  

IMG_0120.JPG

Congratulations Charlotte and to all that entered.  The magnificent work of all that entered is displayed Below:

IMG_1370.jpg


Modern Quilt Guild Riley Blake Designs Fabric Challenge:  Below are the 4 members who submitted quilts to the MQG Riley Blake Design Fabric Challenge.   

IMG_0121.JPG

Luck Raffle Winners:

  • Name Tag Raffle-Diane Moss won a medium metal button shaped box
  • BOM-Lisa won the wonky star blocks

Show & Tell: 

Wow-quilts quilts and more quilts view here.  


Submitted by Derietra Neal-Ferguson, Secretary
April BOM

April Block of the Month

TVBOMApril.png

The April Block of the Month is a little modern and a little retro. Blocks are due at the May meeting, giving the winner the chance to have a quilt ready for Father’s Day in June. Televisions seem like a great choice for a dad and this block is easy to assemble.

As for color? Anything goes! Make it modern fabric and try for contrast so your television doesn’t get lost. A low volume for the screen will help define the image. The original design has embroidery detail and buttons but we’ll leave that for the winner to decide.

The block finishes at 12 1/2” x 12 1/2” and uses 1/4” seams throughout.

The best tutorial for this block can be found on Lori Holt’s website 

We’ll be making the 12 x 12” size but she provides a 6 x 6” size on this page and an 18 x 18” size later on her blog. Following her directions is the easiest way to go for this but just in case, here are the measurements and how I did it.

Background for the block (turquoise in the sample)

  • 2 pieces     3 1/2” x 5 1/2”    
  • 1 pieces      1 1/2” x 4 1/2”
  • 1 square     2 1/2” x 2 1/2”    
  • 2 pieces     1 1/2” x 2 1/2”         
  • 2 pieces     1 1/2” x 8 1/2”    
  • 2 squares   1 1/2” x 1 1/2”
  • 4 squares   1” x 1”

Television (light orange in the sample)

  • 2 pieces      1 1/2”x 10 1/2”  
  • 2 pieces      1” x 6 1/2”
  • 1 piece        1 1/2” x 6 1/2”   
  • 4 squares    1” x 1”

Television contrast (dark orange in the sample)

  • 1 piece          1 1/2” x 6 1/2”    
  • 3 pieces        1 1/2” x 2 1/2”

First Make the Television screen

1 piece, 6 1/2” x 7 1/2”

Begin the block by using corner triangle method on the ‘television screen’. Sew the four 1” squares to each corner of the television screen diagonally, corner to corner on the squares. Trim the seam and press the resulting triangle back.

Next, add the sides to the television.

Sew the 1 1/2” x 6 1/2” piece to the left side of the screen. Then, in order, sew one 1” x 6 ½” piece, then the contrast 1 1/2” x 6 1/2” piece and finally the remaining 1” x 6 1/2” television piece. (This is much easier than the written directions appear!)

TV3.png

Now add the two 1 1/2” x 10 1/2” pieces to the top and the bottom of your screen.          

TV4.png

 The screen is now finished

Next add on the antenna and the legs.

Antenna:

  • To create the antenna, use the corner triangle method on one of the 1 1/2” x 2 1/2” contrast pieces using two of the 1” square background pieces.
  • Then sew the 2 1/2” square to the top of your antenna box.
  • Finally, add a 3 1/2” x 5 1/2” piece to each side of the resulting rectangle.

Feet:

  • To create the feet for the television, it’s corner triangle method again. Use the remaining two contrasting 1 1/2” x 2 1/2” pieces.
  • The 1” square background piece goes on the top of the rectangle,
  • The 1 1/2” piece on the bottom.
  • Be sure to use the opposite corners on each piece.

TV Block Assembly:

Now, assemble the bottom strip of the square. Sew in this order, a 1 1/2” x 2 1/2” background piece, an assembled leg piece (with the small triangle corner on the left top corner), then the     1 1/2” x 4 1/2” background piece, the other leg (small triangle on the right top corner) and finally the remaining 1 1/2” x 2 1/2” background piece.

TV7.png

Make sure your leg pieces are opposite and that the small triangles are on the top. If you look at the next photos, you can tell how I know that’s important!

All that’s left to do now is to finish the block. Add the two 1 1/2” x 8 1/2” pieces to each side of the television. Then add the antenna piece to the top and the legs to the bottom.

TV8.png

Submitted by Linda Iismail


MODERN MYSTERY QUILT-ALONG 2018

First clue will be shared at the General Meeting Saturday, 4/21/18

First clue will be shared at the General Meeting Saturday, 4/21/18


SOUTH FLORIDA MODERN QUILT GUILD

The Modern Mystery Quilt-Along (QAL) Kick-Off is today, April 21st, 2018 and will continue for six months until October 2018.

General Information:

The QAL will consist of six rows which will be joined together to make a quilt. Each of the six rows will be approximately 14.5 inches tall by 42 inches wide.

Each "row" will pertain to part of the story.

Each "row" will have suggested patterns for the quilter to follow – but can be used in an improvisational manner.

Each "clue" will be read at the monthly meeting and will be available on the SFMQG blog within a day or two along with hints and links for that month's block.

Each quilter will use her own fabric palette. Modern quilt fabrics, solid and low volume prints are encouraged to make the blocks "modern". 

Follow the blog for monthly updates!!!

Traverse Bag Workshop with Kate Yates

Please join us on Saturday, June 2nd for the Traverse Bag workshop with Kate Yates. During this workshop, we’ll work together to follow the Traverse bag pattern by Anna Graham (www.noodle-head.com). Participants will receive a copy of the pattern before the class, so they can prepare their fabric and interfacing. In class, we’ll learn how to assemble the bag. This is a fun pattern to make and a great skill-builder because you learn how to insert zippers in two different ways, insert snaps, create straps and piping! If you do all your prep work before class, you may be able to finish the bag in class (or get far enough so you can finish the pattern on your own at home).

Event Details: 

  • Saturday, June 2nd from 9:30 - 3:30
  • Location: Patch Reef Park in Boca Raton
  • Tickets: Members only, $25

Pattern Information from Noodle-head.com:

You’ll love taking this versatile and compact crossbody bag on all of your travels. The zippered top main compartment and handy back zippered pocket keep all your essentials secure while the front pocket(s) provides easy access to the items you use most. Easy to use and wear adjustable crossbody strap and two fun sizes to make!

Bag features:

  • 2 sizes to sew! Regular and Mini
  • Zippered top main compartment
  • Back zipper pocket
  • Front pocket (divided on Regular size) with easy access snap/flap closure
  • adjustable crossbody strap
  • interior slip pocket

Skill Level: Intermediate, or adventurous Advanced Beginner

Approx. Finished Dimensions: 12” W, 9” H, 2” deep – regular (10” W, 7 1/2” tall – mini)

Materials that you’ll bring to the workshop:

Requirements based on 44”-wide fabric. Mini size noted in { }.

  • ¾ yard {½ yard} Exterior Fabric
  • ¾ yard {½ yard} Lining Fabric
  • ½ yard {½  yard} Accent Fabric
  • 2 yards {1½ yards} Fusible Woven Interfacing (Pellon SF101 – 20″-wide) 

Recommended Fabrics: Cotton canvas, cotton/linen canvas, twill, home dec for exterior. Quilting cotton for accent and lining.

Additional supplies + tools: Polyester thread, water-soluble pen/tailor’s chalk, cutting mat, ruler, rotary cutter, glue pen (Sewline glue pen is my favorite), size 14 or 16 denim or Microtex needle, turning tool, ¼”-wide fusible web tape, piping foot

Price for the workshop will include the pattern and the hardware kit, which will include these materials:

  • (2) ¾”-wide rectangle rings & (1) ¾”-wide strap slider
  • 14” zipper {12” zipper} for top zipper closure*
  • 8” zipper {6” zipper} for back zippered pocket*
  • size 24 metal snap
  • snap setting tool
  • 1 yard of 1/8’’ diameter cotton cording for making piping

We’ll also bring tools for setting snaps (but you’re welcome to bring your own) and cording so that we can make piping for the bags (you’ll make the bias tape for the piping before class).

Tickets are available for members only for $25 through our store. This price includes the pattern and hardware kit – you supply the fabric and interfacing. When you sign up, you'll be asked to select your size (regular or mini) and hardware preferences.